|
|
|
|

|
I know people have had success using a router and roundover bit to break the back of tote shaping, but I prefer the less accident-prone approach of using rasps. That is to say, Im less accident-prone that way. The Aurious slender shape was a boon on the inside curves. |

|
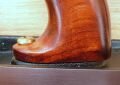
The basic shape done and lookin pretty good to my traditionalist eye. |

|
A good deal of sanding and shaping later. |

|
Now as a rule Id consider disembowelment too good for anyone staining Cherry, but I wanted to test this tote on its merits without being made unnecessarily conscious of it being different, so I figured hell and damnation was worth the risk to make it match the front knob a little better. Dark Oak and Mahogany stains, in different proportions, have proved equal to the task of replicating many a tool handle colour in the past, so if it aint broke
|

|
Now the observant will have noticed I seem to be asking one single bolt to do the work of two. Not such a good idea on a plane the size and weight of the BUPP, as I think youll agree. But wait, what did Stanley et al do for all those years? Yep, a screw through the toe. Taking the opportunity of a pause between staining and polishing the new handle, I again used the Rat to bore a hole for such a screw from underneath, fastened the tote to the plane, and scratched in the location for a corresponding threaded hole. Why from underneath? Simply because you cant get to the toe from above because of the angle of the bulk of the handle. |

|
So the scariest bit of all; drilling and tapping a hole in an otherwise perfectly good plane. I dont recommend it for relaxation, but as long as you take care, its really not too bad. I went for M6 size as being about right. |

|
I started the tap off in the drill press, switched to using a tap wrench, and finally switched taps to a bottom tap in order to thread right to the bottom (more or less) of the blind hole. If youve not been exposed to the wonderful world of taps and dies, I recommend it. Its very a handy thing to be able to do in all sorts of instances. Anyway, the result. Cest magnifique, nest pa? Okay, so its just a hole. But it looked pretty darn fine to me by that stage, I can tell you. |

|
Splashing out on a suitable brass set screw for the toe seemed justified, even at 72p a piece! I blame the fact they were packaged up for the Yacht-y market, which always puts the price up
Naturally it was too long, but a little hacksawing took care of that, utilising the dodge of threading a nut onto it to a point above the cut so the action of removing it cleans up the sawn threads a little. |
|
You might need to relieve the toe a little to get the screw head to sit more flush. |

|
and a few coats of shellac later. Not too shabby, in my opinion. Its certainly already proved to be worth doing as far as Im concerned, although I'm assured its a step backwards, design-wise. That's probably absolutely right, but then Ive always had a suspicion Im a bit of a backwards design too
|
Previous page Projects Menu
|